Daily Order Management
Your orders, organized. Your priorities, clear.
This section covers your daily workflow in Trackod — how to start your morning knowing exactly which orders need attention, and how to keep a clean record of everything that happens throughout the day.
Two screens make this possible: the Orders page (where you see everything) and the Order Details page (where you manage individual orders). Let's walk through how to use them.
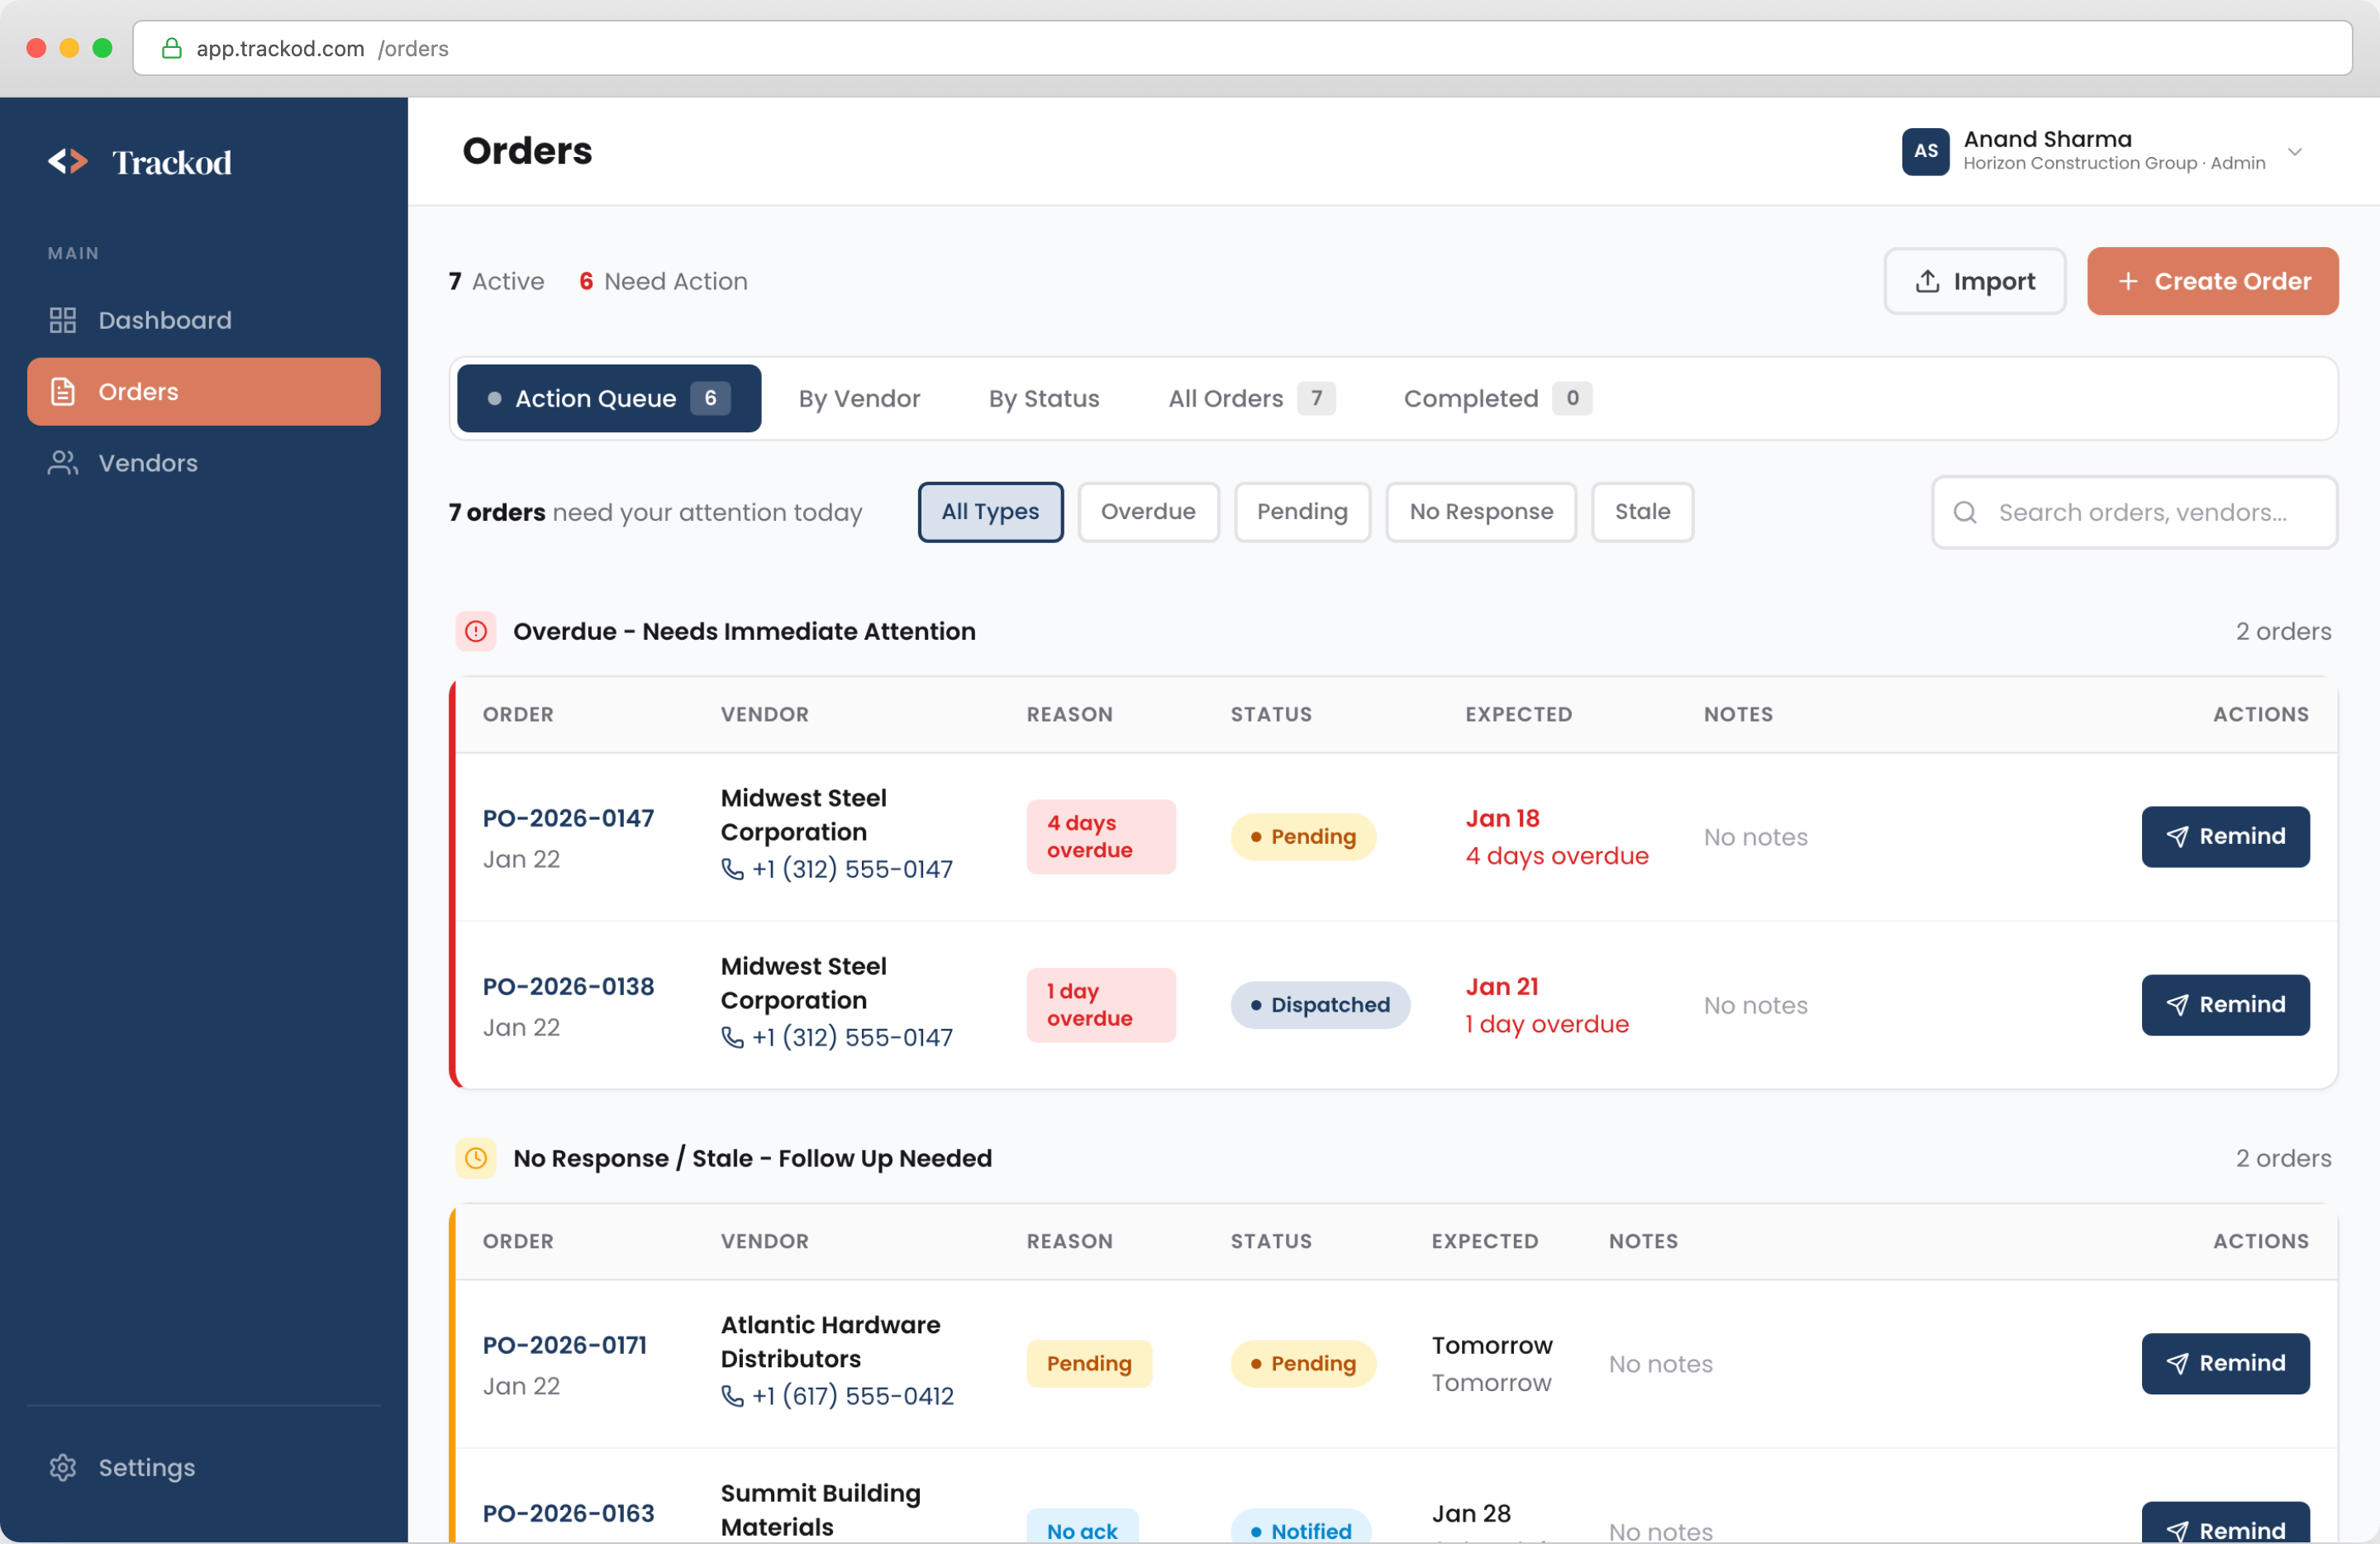
The Orders Page
The Orders page is your central workspace for managing purchase orders. All your orders live here — the tabs at the top let you view the same information through different lenses, depending on what you need to accomplish.
Understanding the Order Lifecycle
Every order in Trackod progresses through five stages, from creation to delivery. Understanding this lifecycle helps you interpret what you see throughout the system.
| Status | What It Means | What Happens Next |
|---|---|---|
| Pending | Order created in Trackod but not yet sent to the vendor | Send notification to vendor |
| Notified | Vendor has received the purchase order | Await vendor acknowledgment |
| Acknowledged | Vendor confirmed they will fulfill the order | Monitor for dispatch update |
| Dispatched | Vendor has shipped the order | Track delivery |
| Delivered | Order received at the delivery location | Complete — moves to Completed tab |
Status changes are recorded automatically when vendors respond through their portal, or manually when you update an order based on a phone call or other communication.
Same Orders, Different Views
The tabs at the top of the Orders page display the same underlying data, organized for different purposes. Changes you make in one view — updating a status, adding a note — appear across all views automatically.
| When You Need To... | Use This Tab | What You'll See |
|---|---|---|
| Start your morning and find what needs attention | Action Queue | Orders prioritized by urgency |
| Review all orders from a specific supplier | By Vendor | Orders grouped under each vendor name |
| See all orders at a particular stage | By Status | Orders grouped by lifecycle stage |
| Search for a specific order or browse everything | All Orders | A complete list of every active order |
| Reference past deliveries or review history | Completed | Delivered orders — your historical record |
Begin each day with the Action Queue. It surfaces the orders requiring follow-up, so you can address urgent items first.
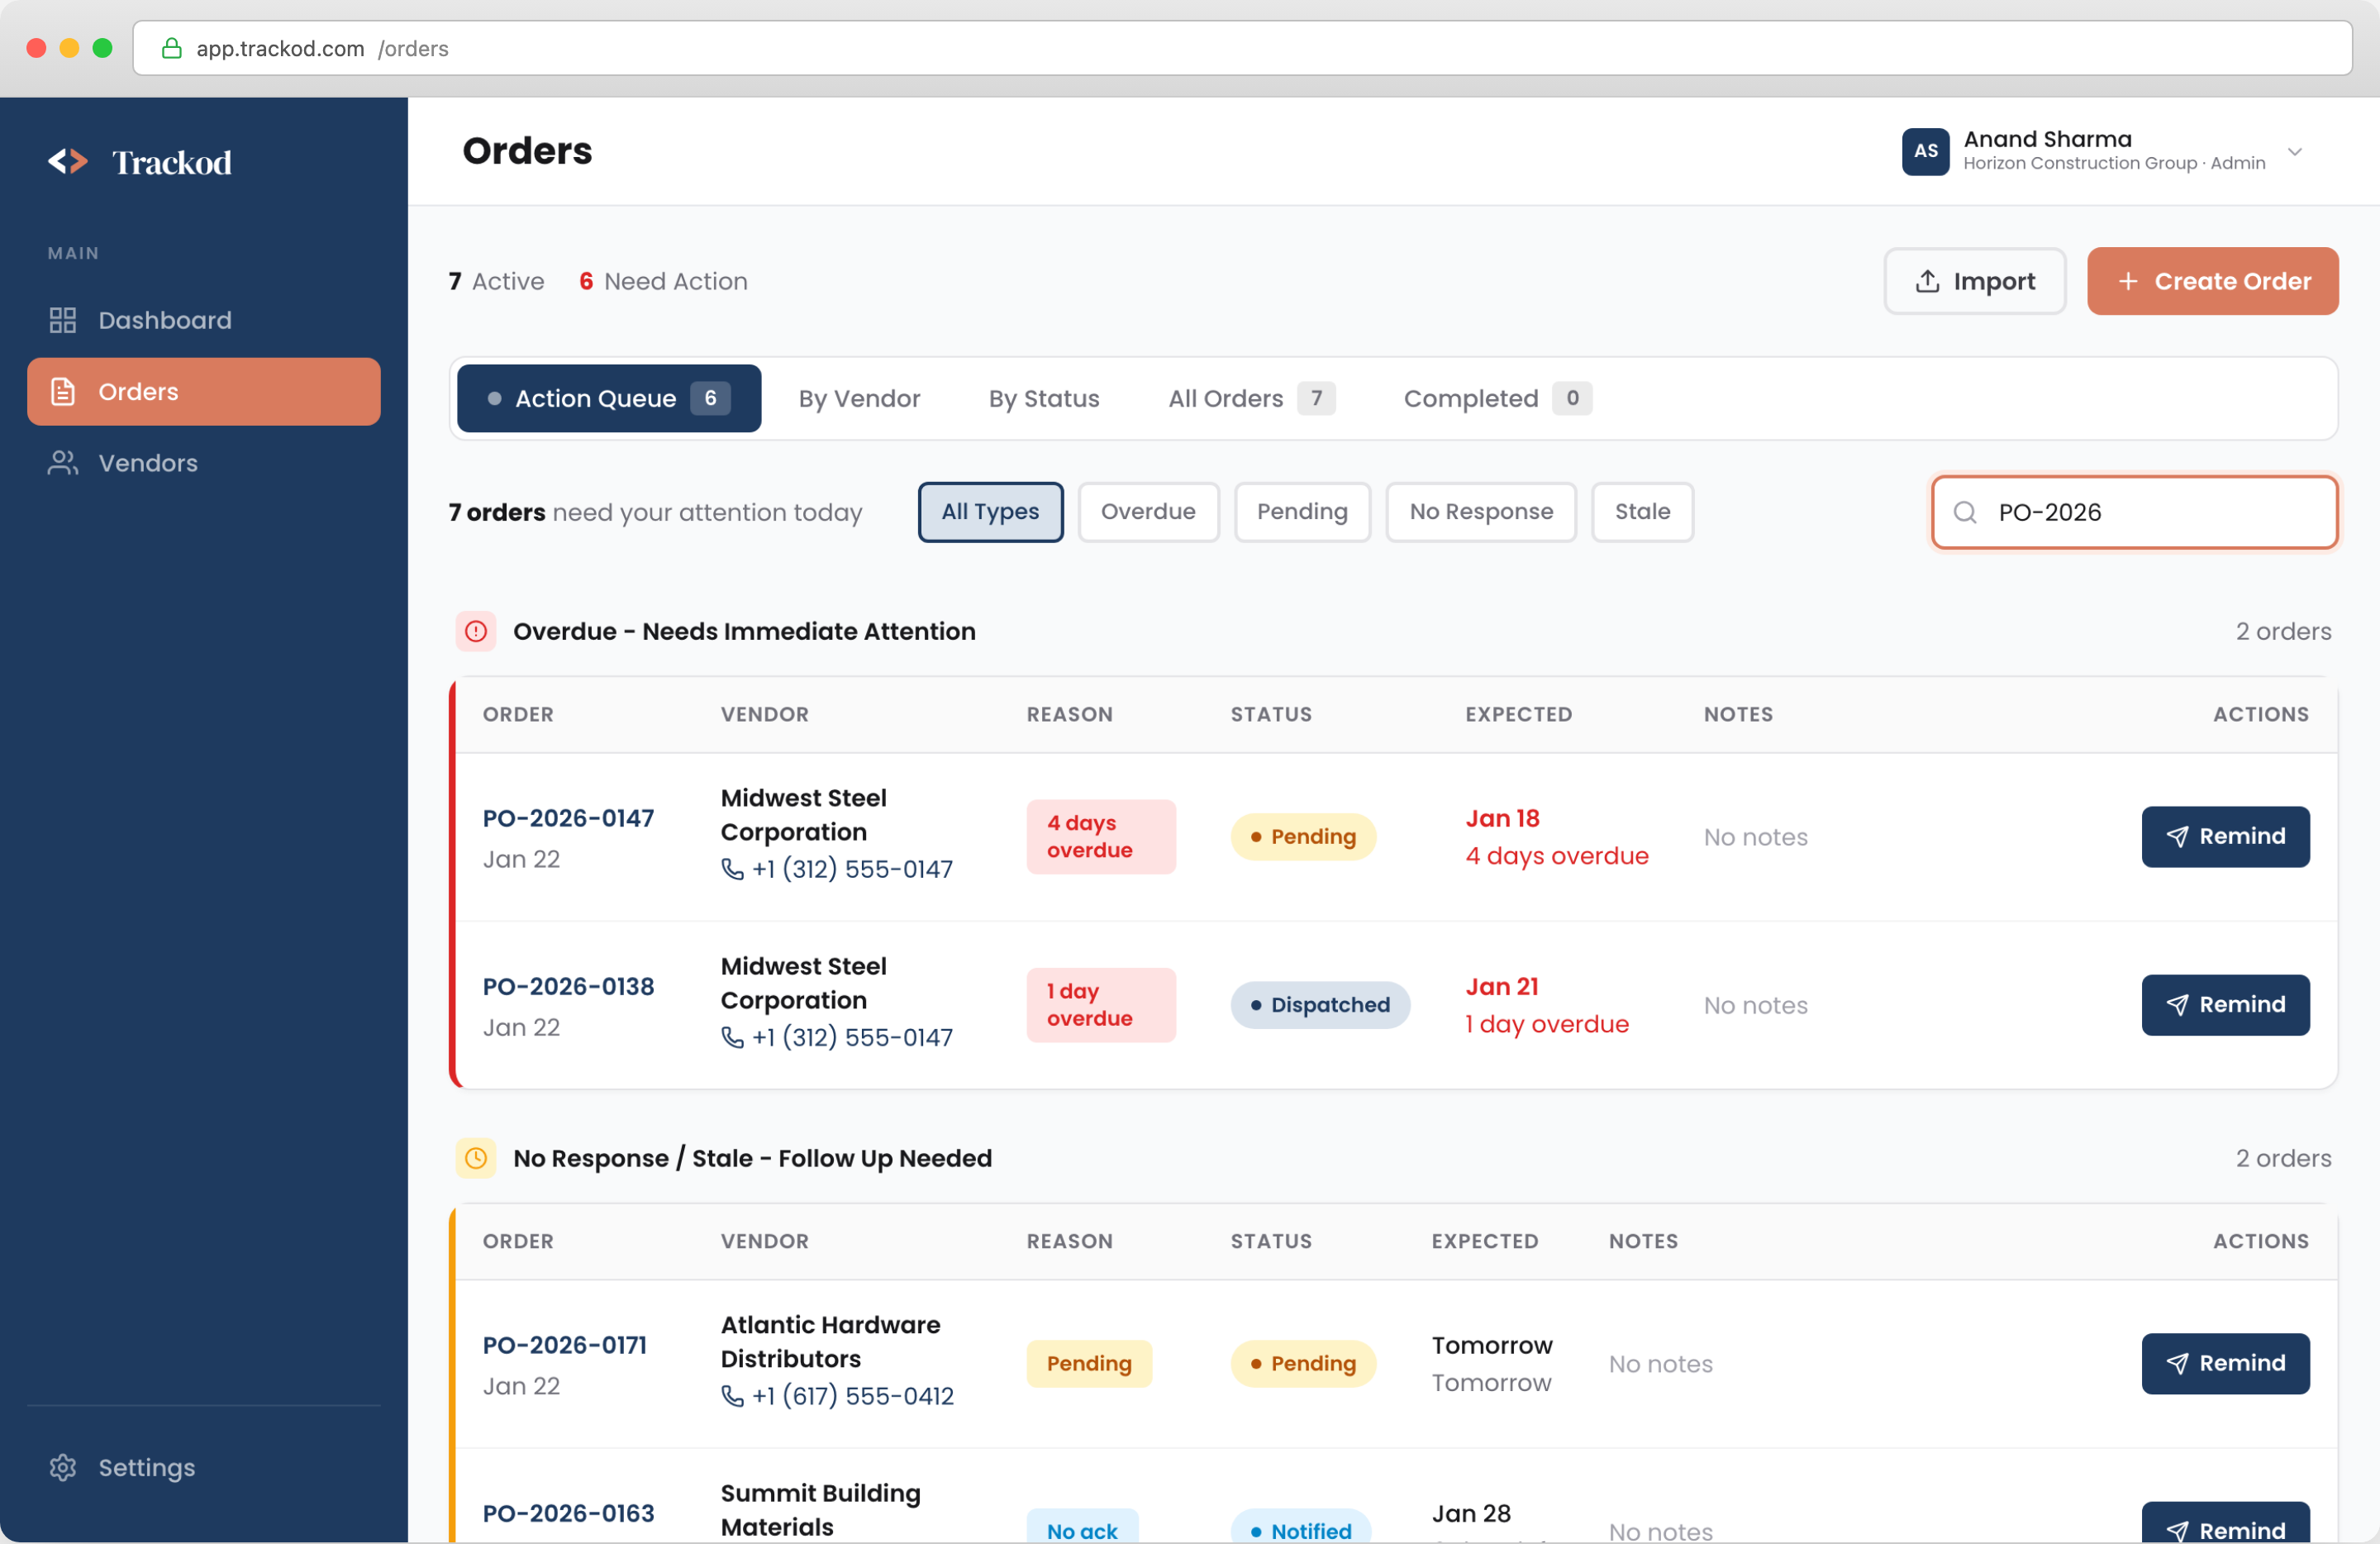
Finding a Specific Order
Use the Search function at the top of the page to locate any order quickly.
You can search by:
- Order reference number (e.g., PO-2026-0142)
- Vendor name
- Delivery location
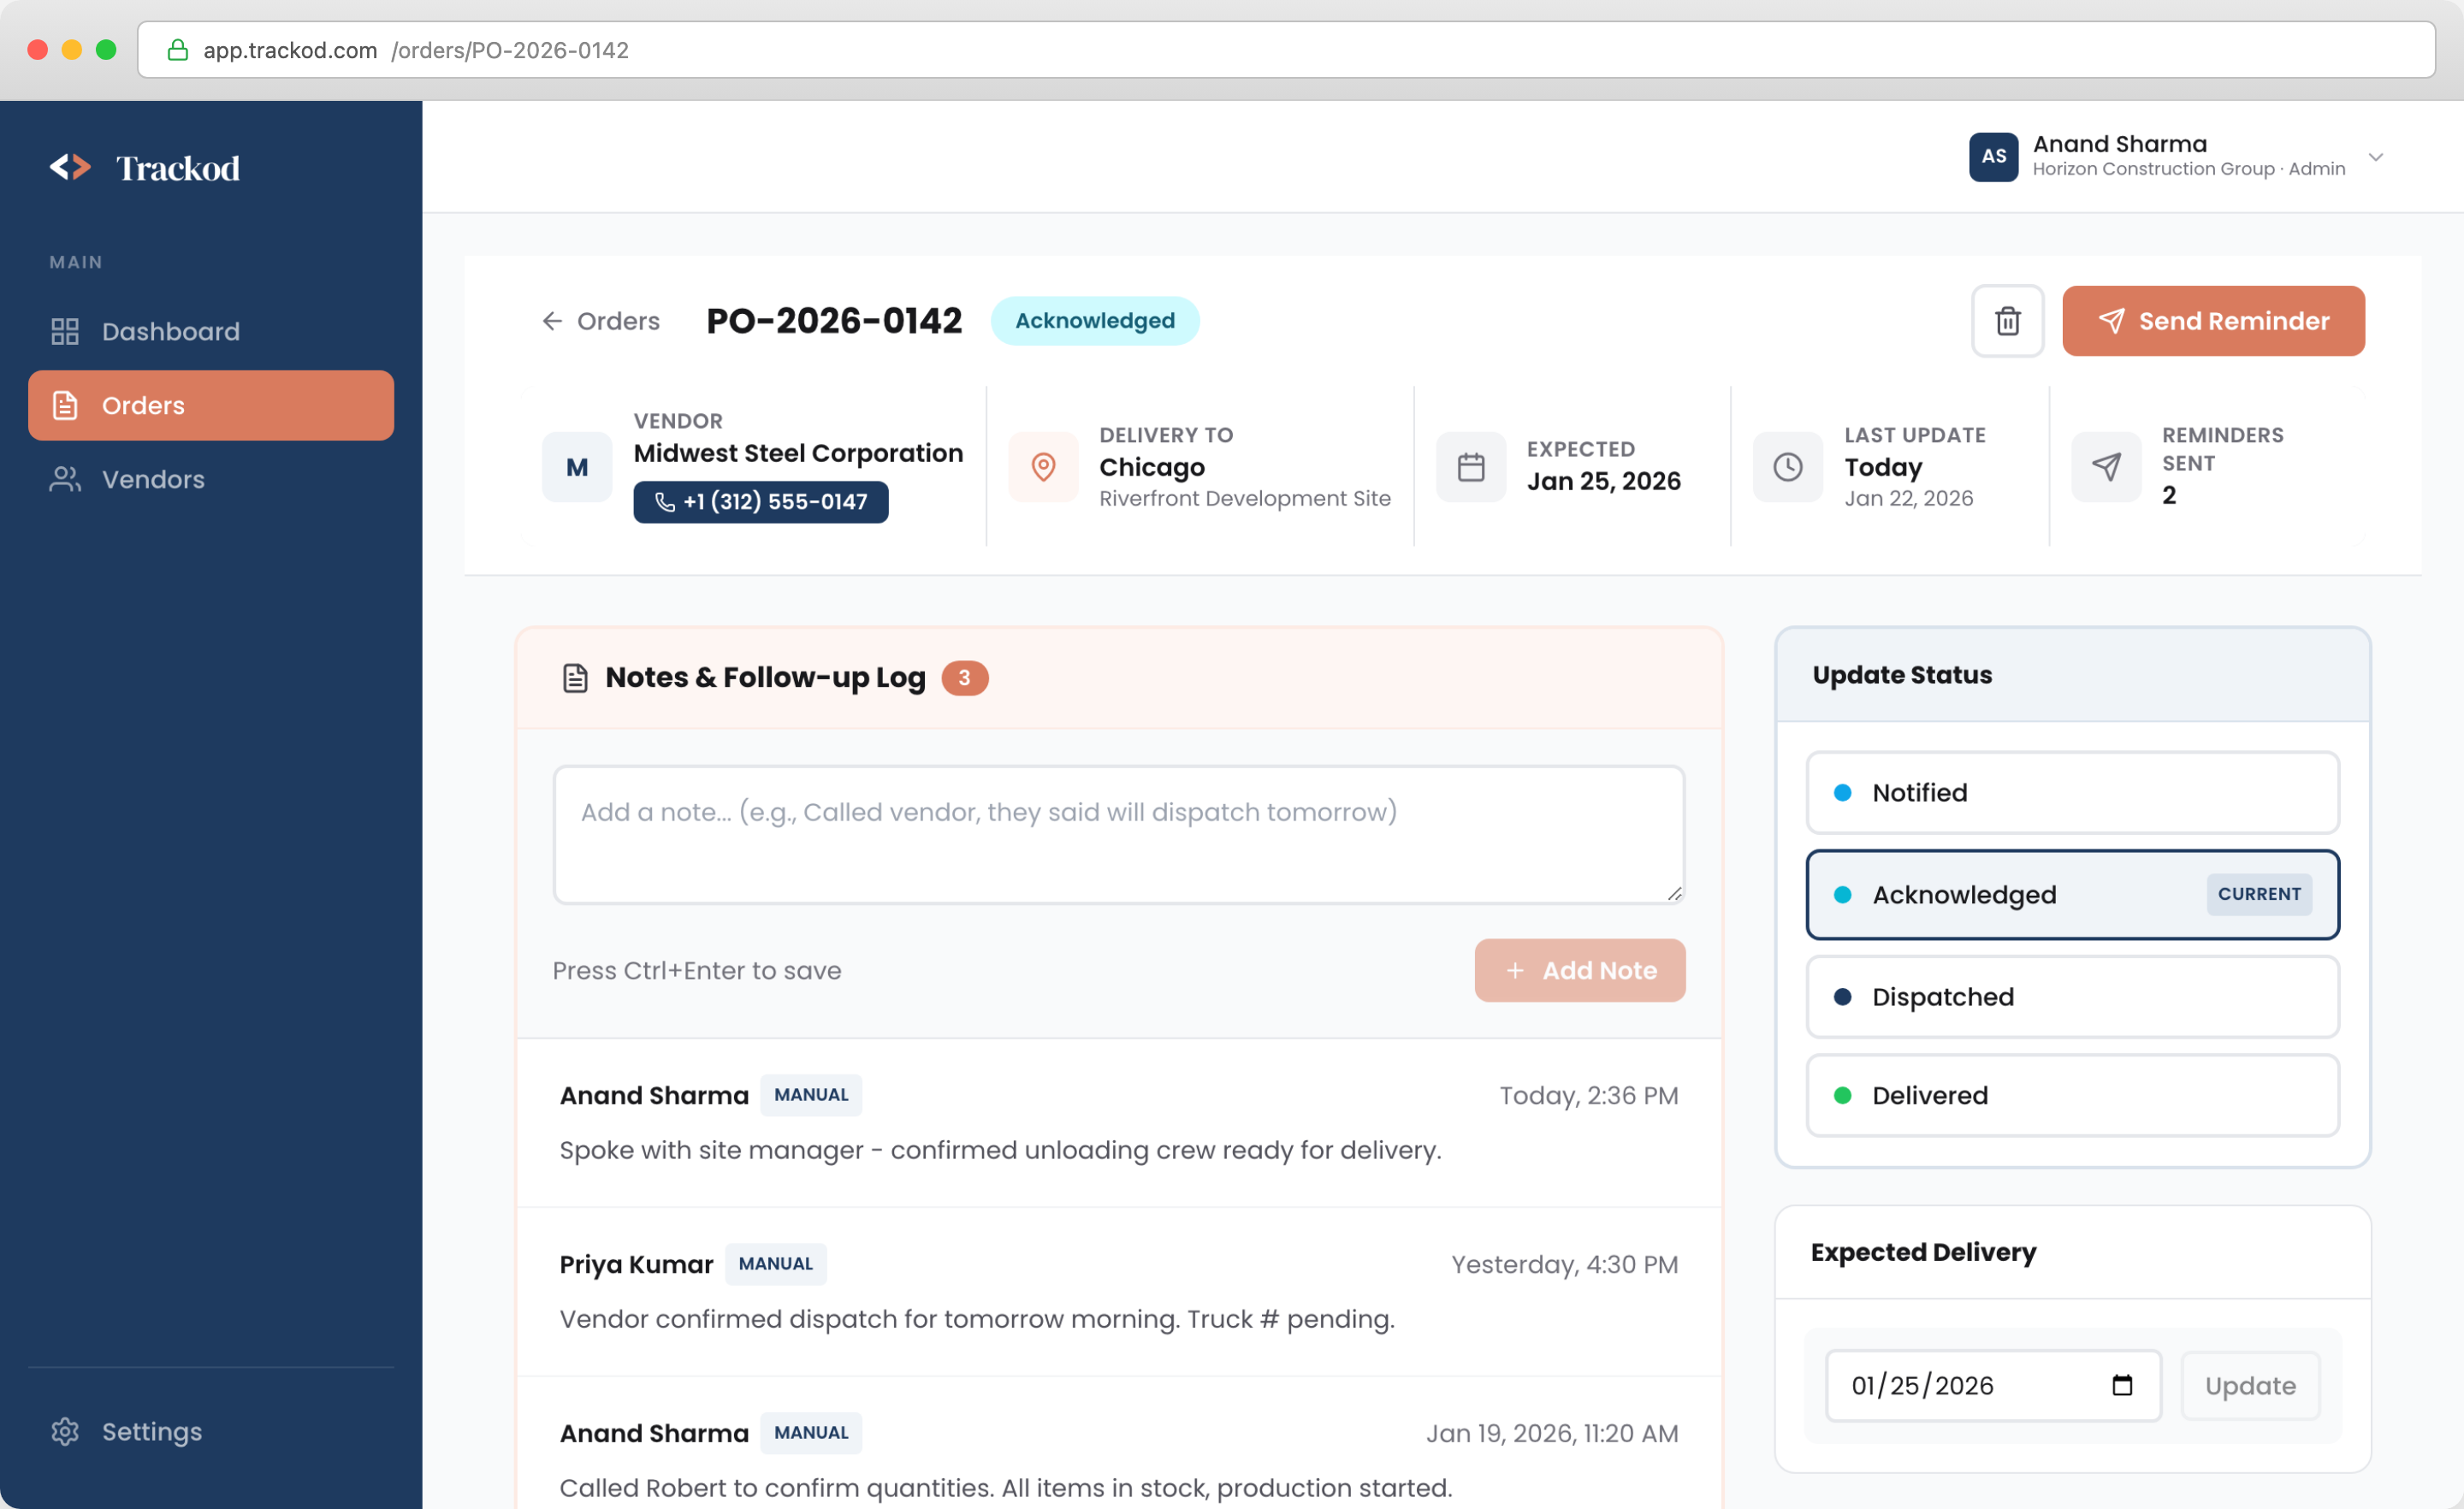
The Order Details Page
Click any order from the list to open its details. This is where you manage individual orders — sending reminders, updating status, recording notes, and reviewing the complete history.
Page Layout
The Order Details page is organized into distinct sections:
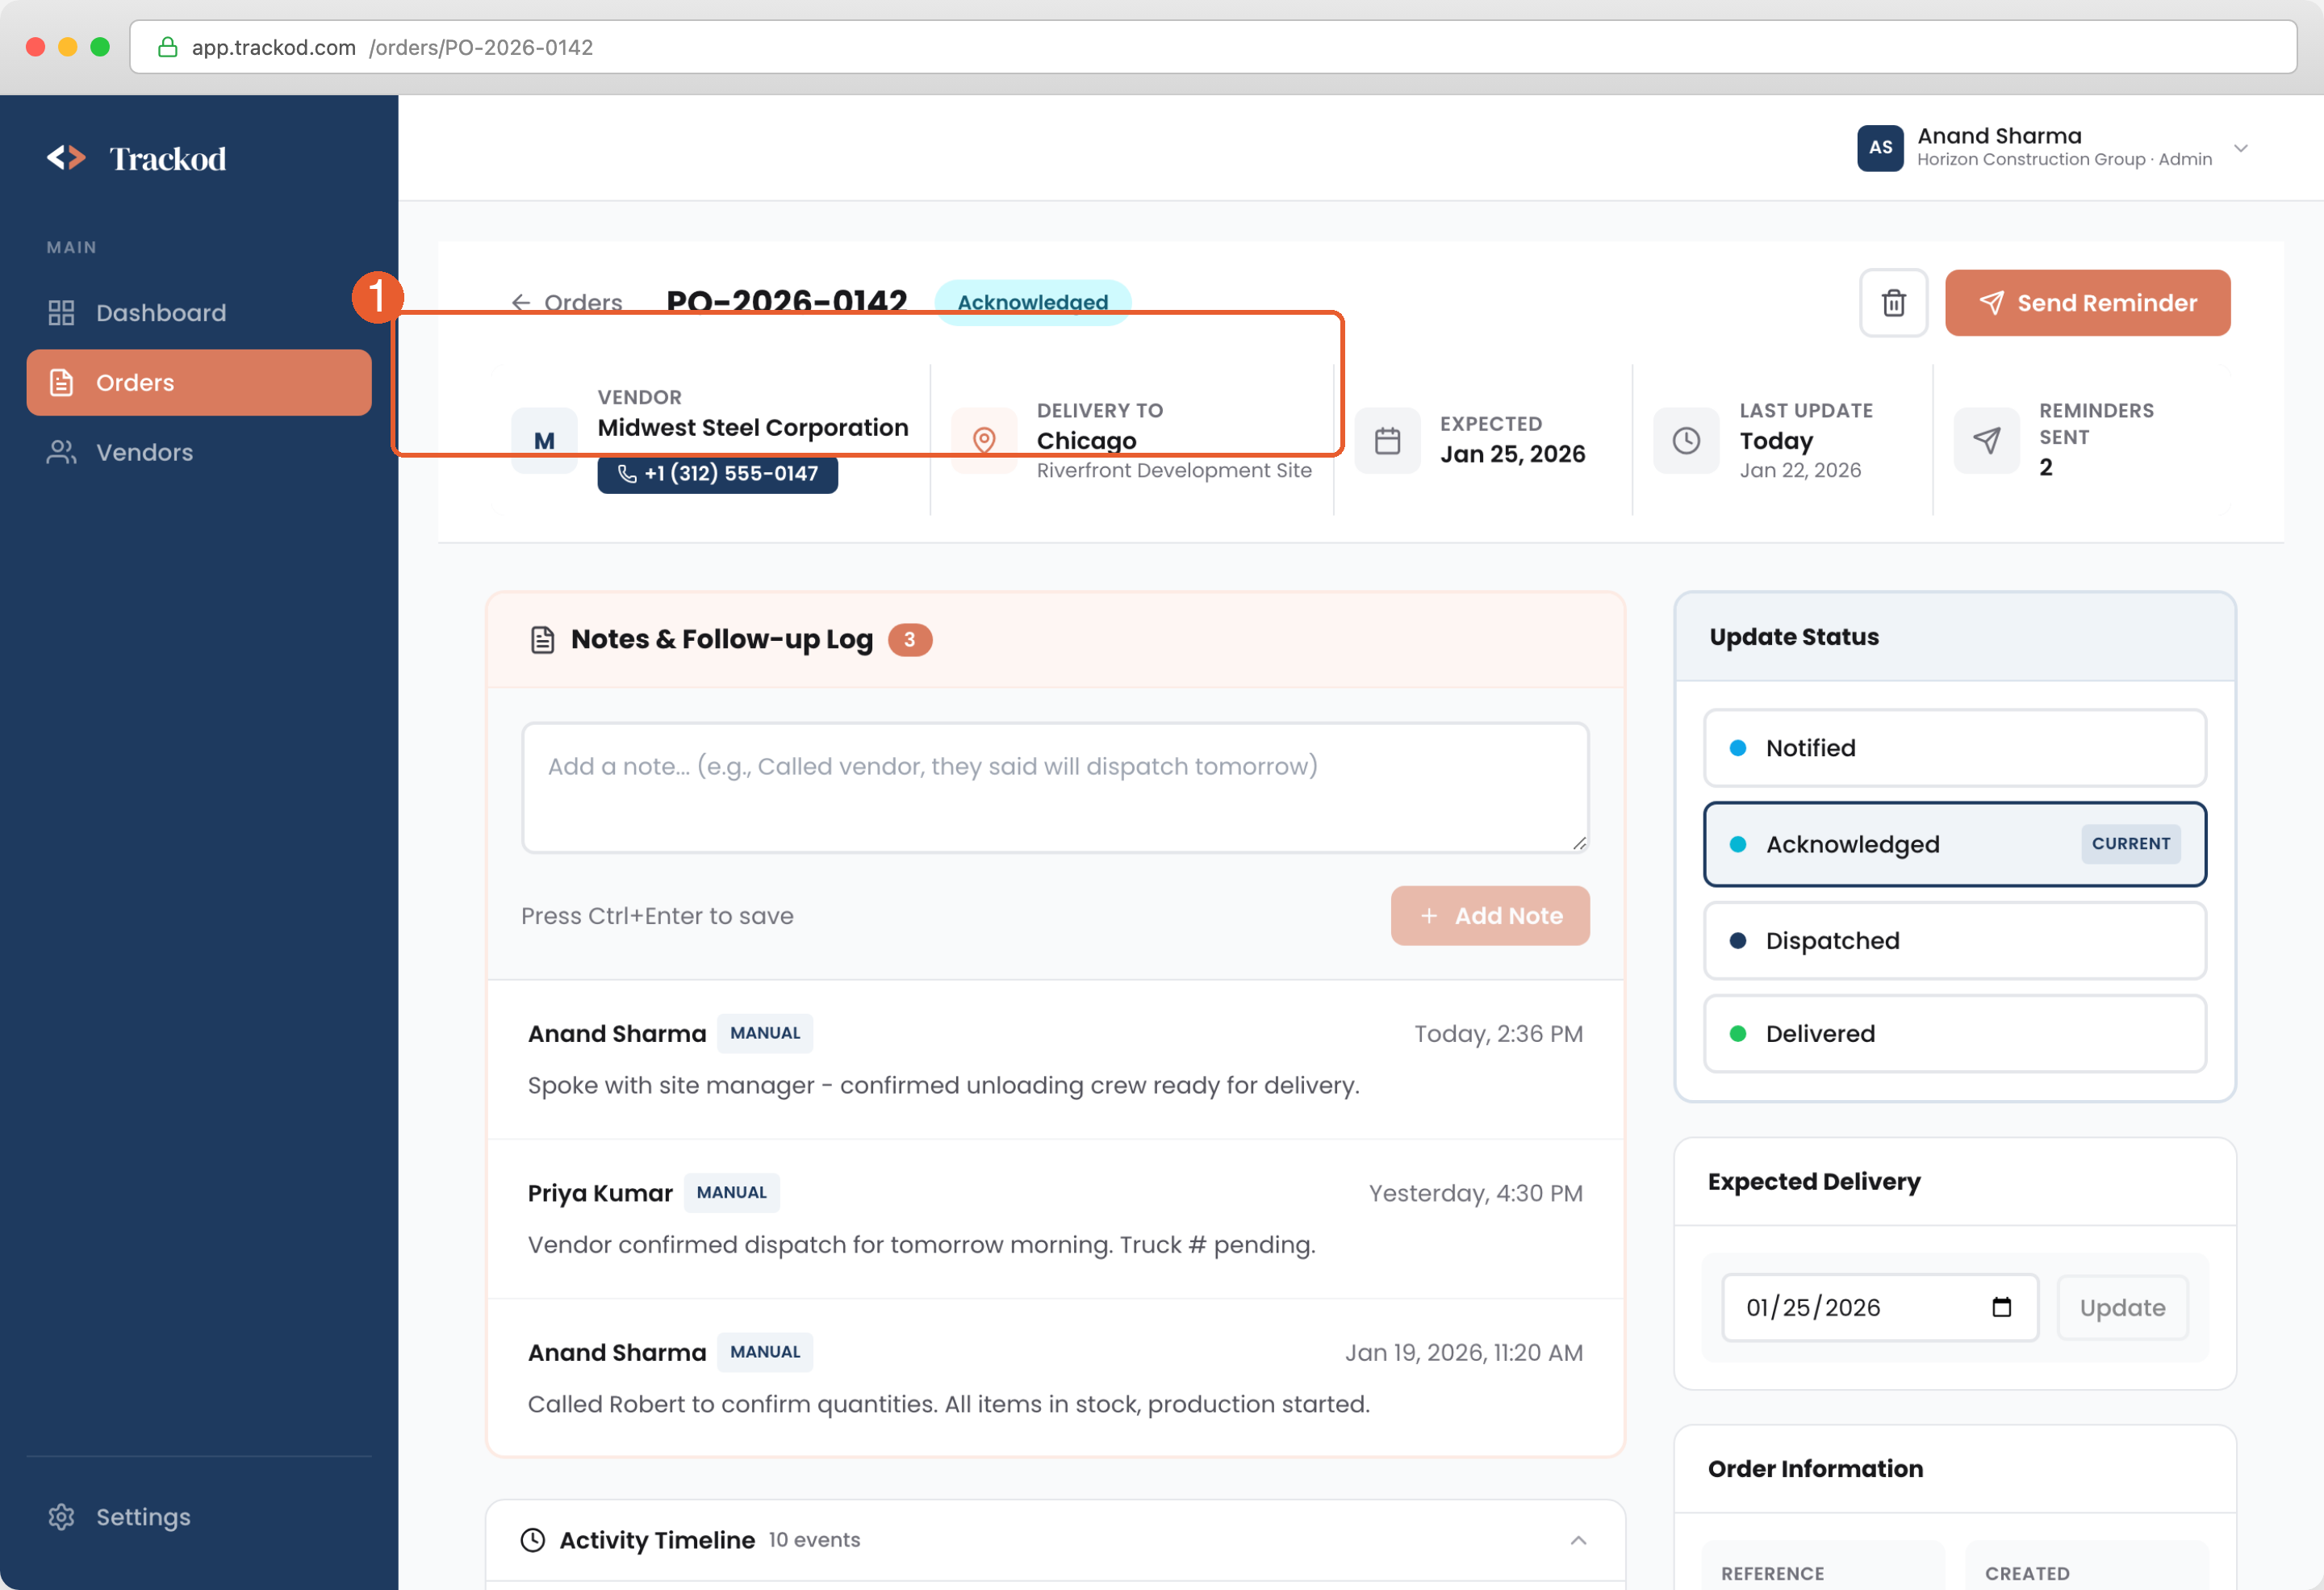
Header
- Order reference number (e.g., PO-2026-0142)
- Current status badge
- Key metrics: vendor name, expected date, days overdue (if applicable), reminders sent
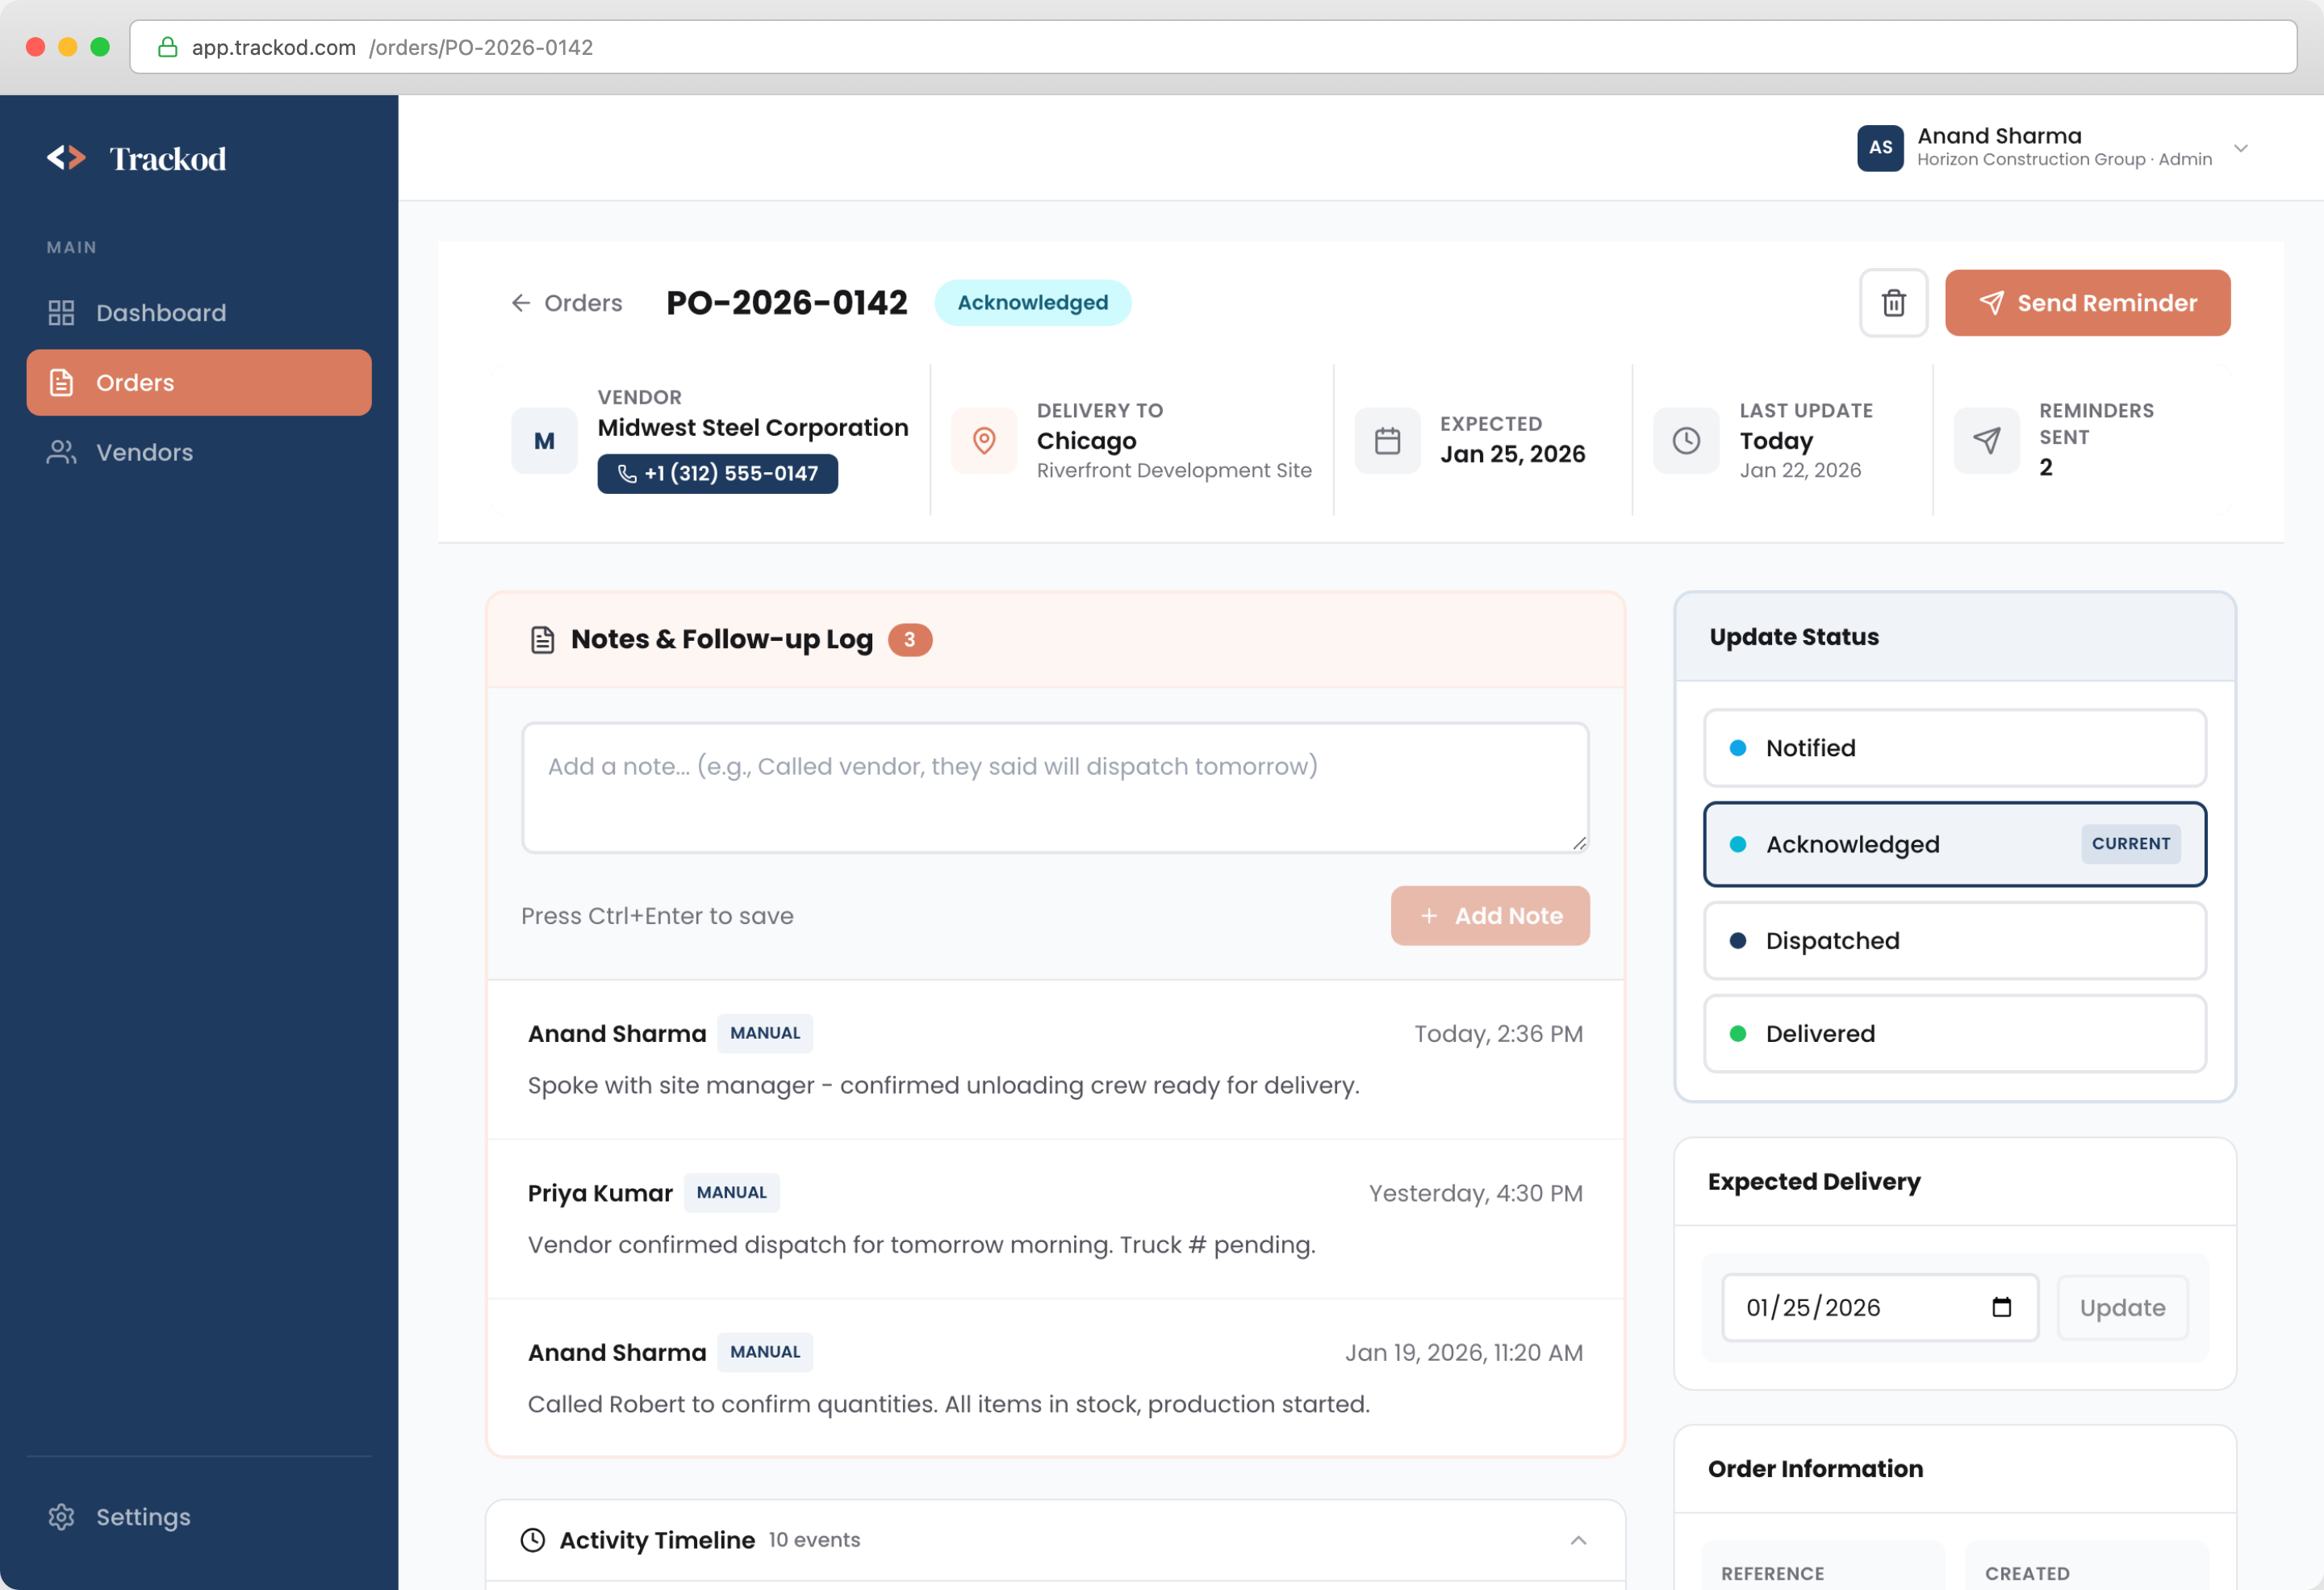
Main Area (Left Side)
| Section | Purpose |
|---|---|
| Notes & Follow-up Log | Record phone calls, conversations, and important details |
| Activity Timeline | Complete history of everything that happened with this order |
| Line Items | What was ordered — items, quantities, units |
Sidebar (Right Side)
| Section | Purpose |
|---|---|
| Update Status | Change the order status as it progresses |
| Expected Delivery | Update the expected date when it changes |
| Delivery & Contact | Site contact details for the delivery location |
| Vendor Details | Vendor contact information — phone, email, WhatsApp |
What You Can Do
| Action | Purpose | Result |
|---|---|---|
| Send a Reminder | Prompt the vendor to respond or provide an update | Email sent to vendor; recorded in Activity Timeline |
| Update Status | Move the order to the next stage in the lifecycle | Status badge changes; recorded in Activity Timeline |
| Add a Note | Record a phone call, conversation, or important detail | Note visible to your team; recorded in Activity Timeline |
| Review Activity Timeline | See the complete history of who did what and when | Full audit trail of all order events |
Every action you take is automatically recorded in the Activity Timeline, creating a complete history that your team can reference at any time.
Send a Reminder
When a vendor has not responded, you can send a reminder directly from Trackod.
When to use: The order shows "Pending Response" or "Stale" in the Action Queue, or you need to prompt the vendor for an update.
What happens: Trackod sends an email to the vendor with a link to the order. The vendor can click the link, view the order details, and update the status directly. The reminder is recorded in the Activity Timeline.

The reminder count updates, and the action appears in the Activity Timeline.
Reminders are sent via email. If you contact the vendor through WhatsApp or phone instead, add a note to record what was discussed.
Update Status
As orders progress, their status changes from Pending through to Delivered.
When to use: The vendor has confirmed shipment, the order has arrived, or you have information that the order has moved to the next stage.
How status updates work:
- Vendor updates: When a vendor updates the order through their portal, the status changes automatically in Trackod
- Manual updates: If a vendor provides an update via phone or WhatsApp (rather than through the portal), you can update the status yourself to keep the record accurate
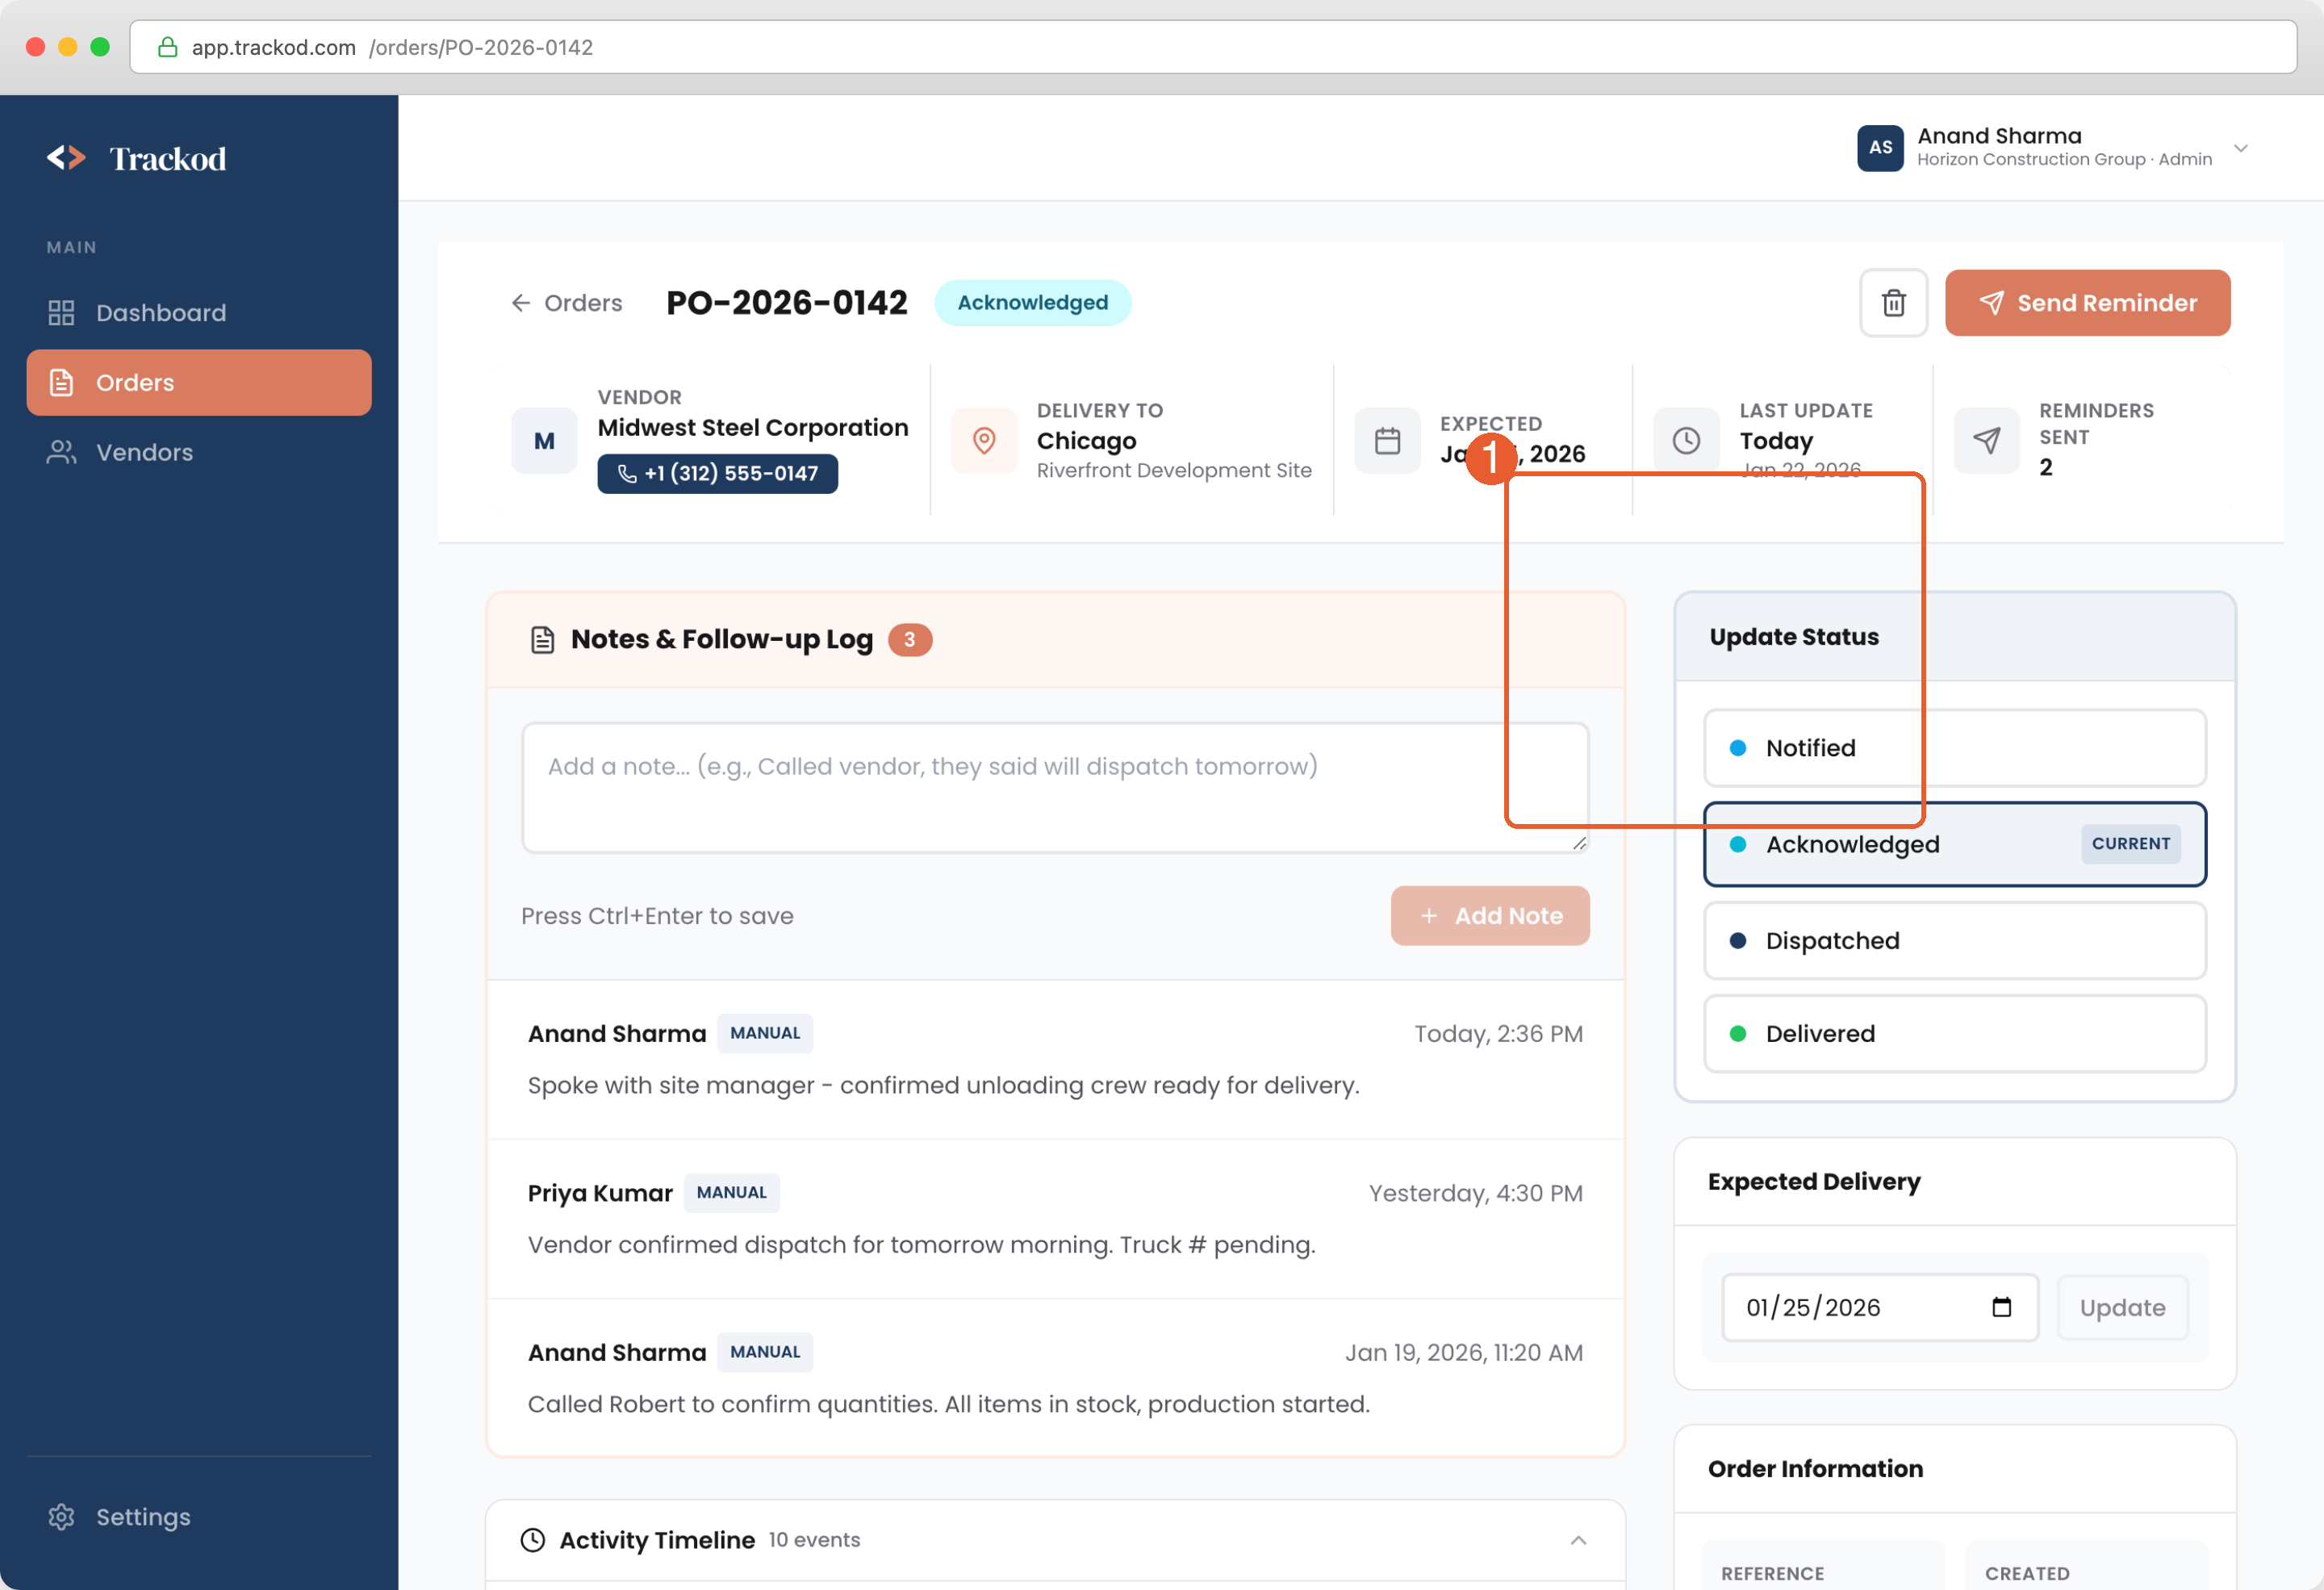
The status badge changes immediately, and the update is recorded in the Activity Timeline with your name and timestamp.
Add a Note
Notes capture important information that is not reflected in automatic updates — phone calls, conversations, commitments, or anything your team should know.
When to use: After a phone call with the vendor, when you learn something important, or when you want to leave context for your colleagues.
Your note appears immediately with your name and timestamp. It also appears in the Activity Timeline, ensuring a complete record.
When updating status, you can add a note at the same time to explain the change.
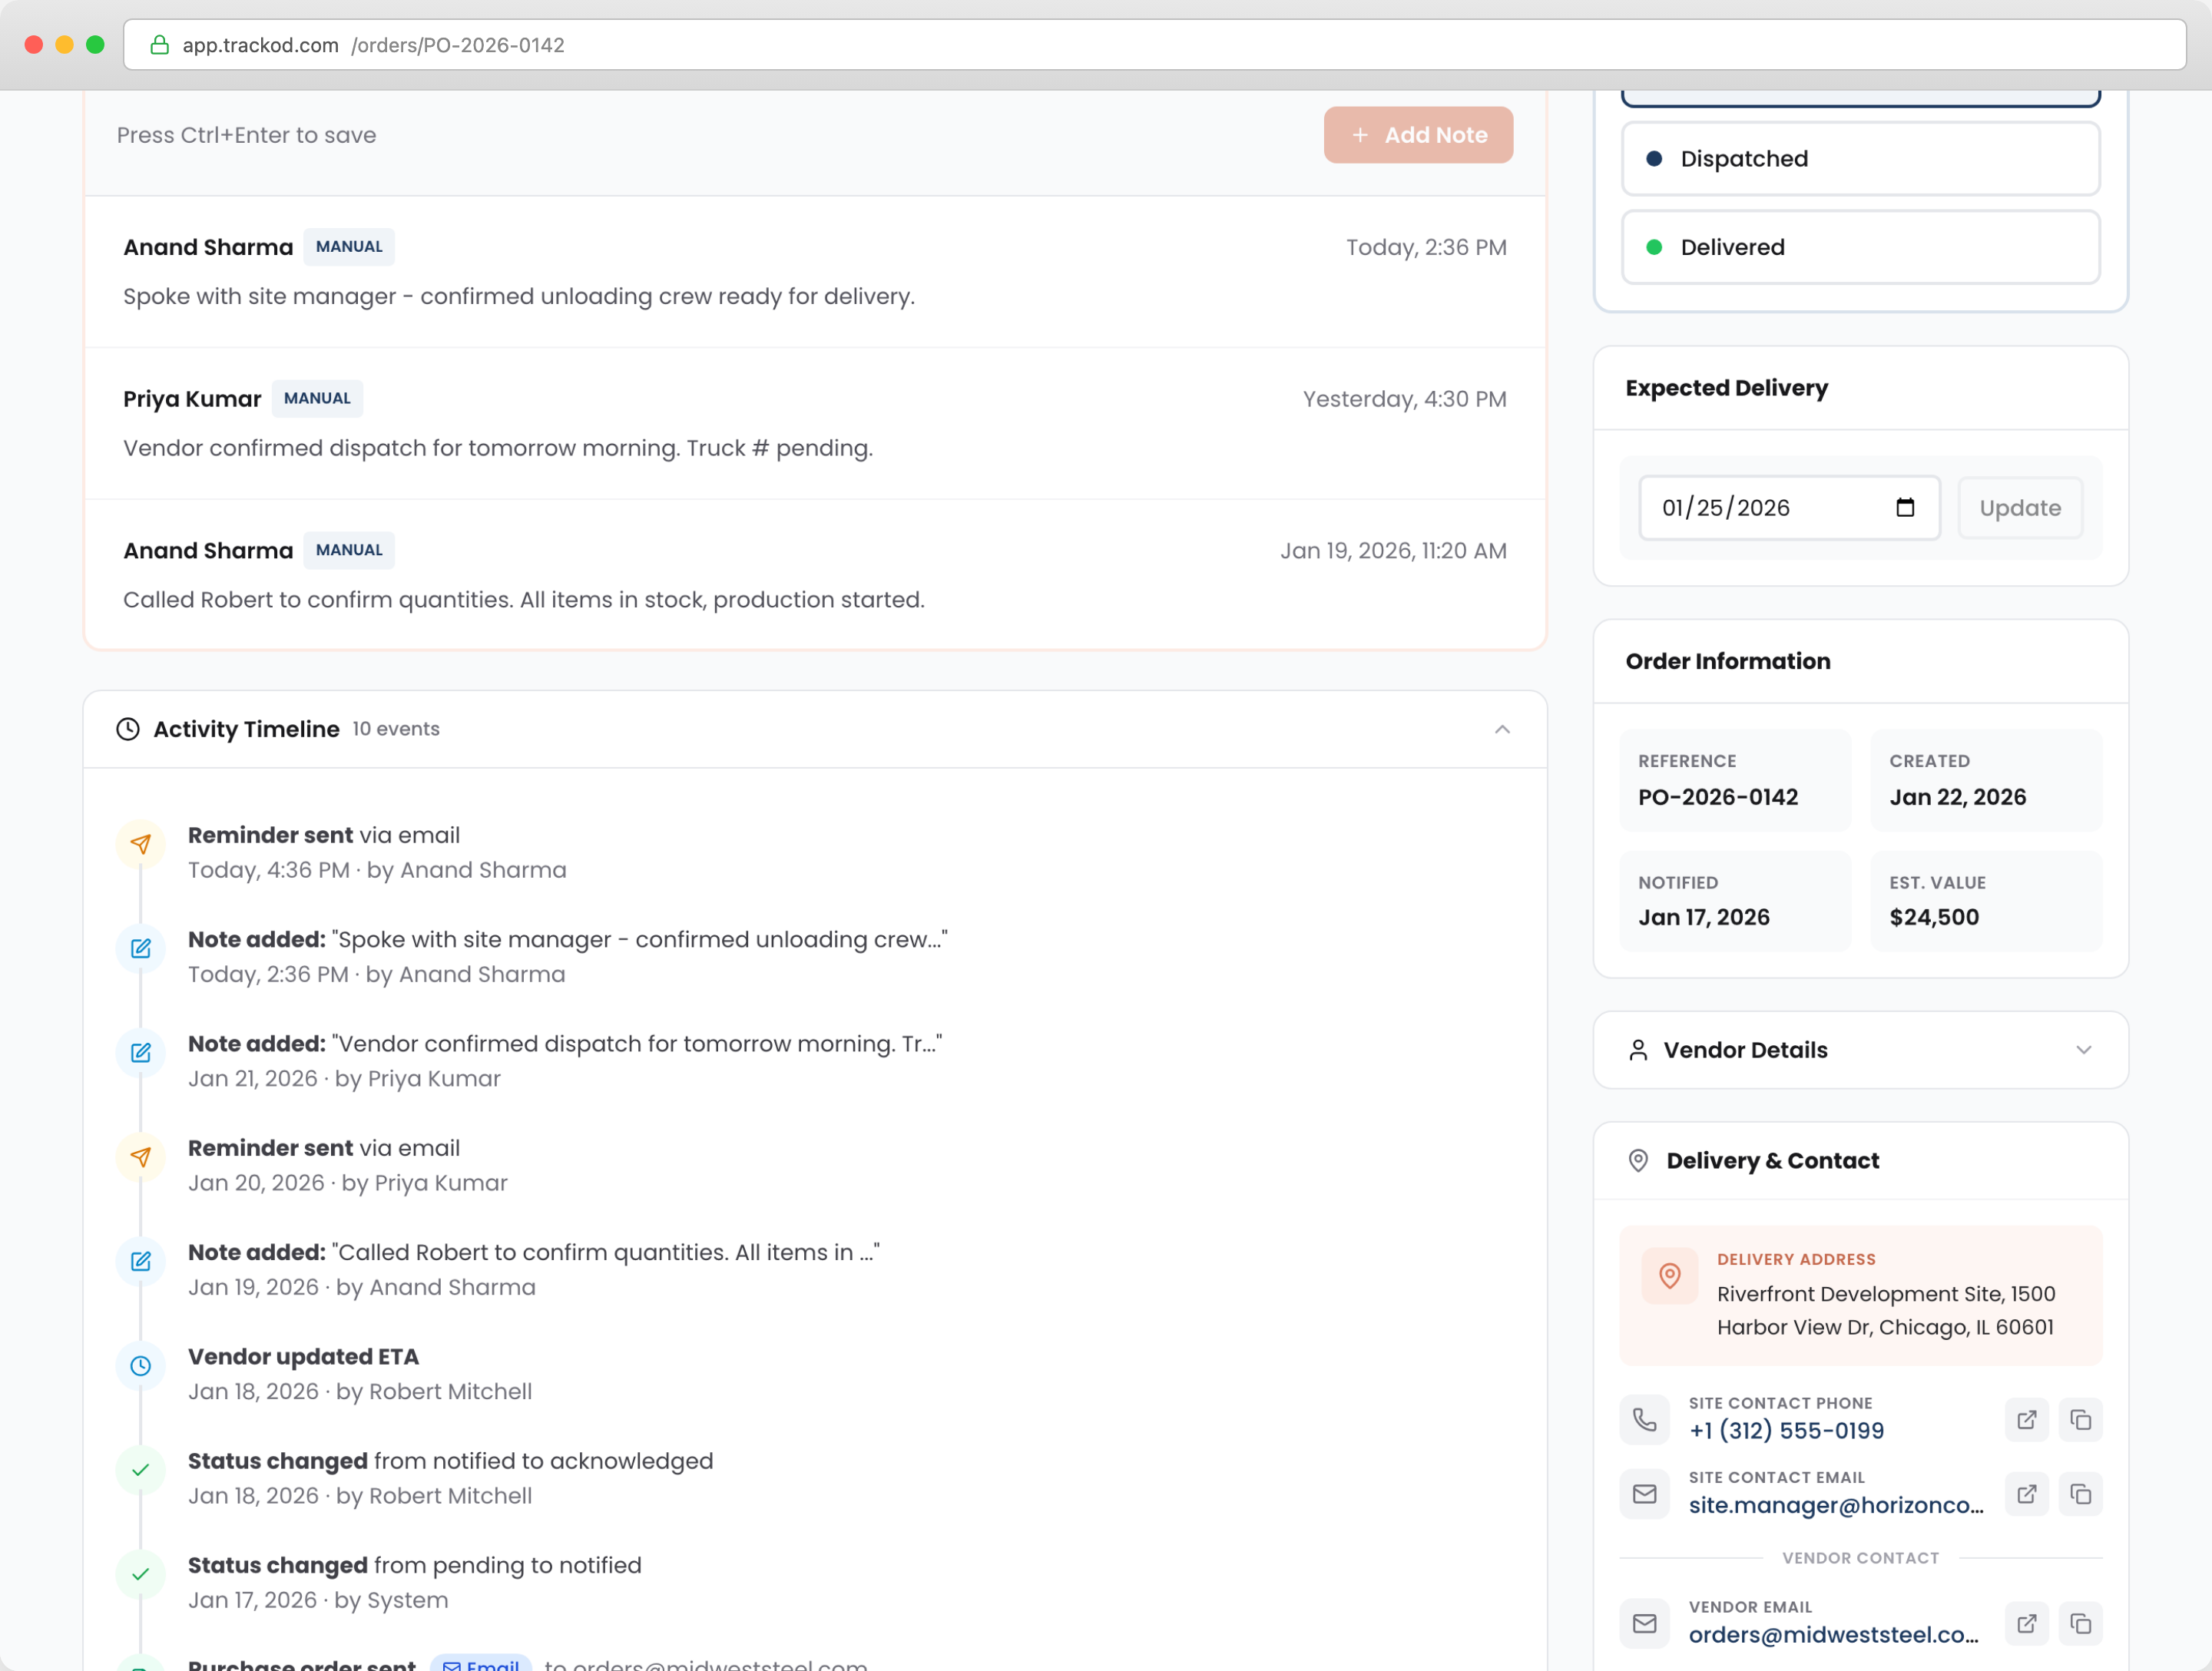
Review the Activity Timeline
The Activity Timeline is a chronological record of everything that has happened with this order — who did what, and when.
What is recorded automatically:
- Order creation and import
- Notifications sent to vendors
- Vendor responses and status changes
- Reminders sent (and through which channel)
- Notes added by team members
- Status updates (by vendors or your team)
When to use:
- When your manager asks about an order's history
- When a colleague is away and you need to understand the context
- When reviewing what happened with a delayed or problematic order
- When you need to verify what was communicated to the vendor
The Activity Timeline eliminates the need to search through emails, WhatsApp, or spreadsheets. Everything is in one place, tied to the order.
Contact Information
Need to call the vendor or the delivery site? Contact details are available in the sidebar.
Click any contact to call or send a message directly. After your conversation, add a note to record what was discussed.
Your Daily Workflow
Here is a recommended routine for using Trackod each day:
| Time | Action |
|---|---|
| Morning | Open the Action Queue. Work through Overdue, then Pending Response, then Stale. Follow up on orders that need attention. |
| During the day | When you make calls or have conversations, log notes in the relevant order. Update status when orders progress. |
| Before you leave | Quick scan of the Action Queue to ensure nothing was missed. |
This routine keeps everything organized and ensures nothing falls through.
Summary
| Screen | Purpose |
|---|---|
| Orders Page | See all orders, use tabs to organize, start with Action Queue |
| Order Details | Manage individual orders — notes, status, contacts, history |
| Daily Routine | What to Do |
|---|---|
| 1. Check Action Queue | Find orders that need attention |
| 2. Follow up as needed | Call vendors, send reminders, update status |
| 3. Log your activities | Add notes so the team stays informed |
What's Next
Now that you know how to manage orders day-to-day, learn more about the Action Queue and how it helps you prioritize your work.
Continue to Action Queue for a deeper look at this feature.